sbm IoT curcus
https://learn.sparkfun.com/tutorials/photon-redboard-hookup-guide
https://learn.sparkfun.com/tutorials/esp8266-thing-development-board-hookup-guide/example-sketch-blink-with-blynk
https://learn.sparkfun.com/tutorials/photon-redboard-hookup-guide
https://learn.sparkfun.com/tutorials/esp8266-thing-development-board-hookup-guide/example-sketch-blink-with-blynk
https://learn.sparkfun.com/tutorials/photon-redboard-hookup-guide
https://learn.sparkfun.com/tutorials/esp8266-thing-development-board-hookup-guide/example-sketch-blink-with-blynk
cyvnpnz9jm.database.windows.net;initial catalog=iotdatabase;user id=kurt;password=XXXXXX;MultipleActiveResultSets=True
var ctx = new iotdatabaseEntities();
ctx.IotDataTables.Add(new IotDataTable
{
DeviceId = request.DeviceId,
SensorType = request.SensorType,
SensorValue = request.SensorValue
});
ctx.SaveChanges();
<!DOCTYPE html>
<html>
<head>
<meta charset="utf-8" />
<meta name="viewport" content="width=device-width, user-scalable=no,shrink-to-fit=no, initial-scale=1.0, minimum-scale=1.0, maximum-scale=1.0" />
<title>Getting data from a json API</title>
<link rel="stylesheet" href="/https://code.jquery.com/mobile/1.4.5/jquery.mobile-1.4.5.css" />
<script src="/https://code.jquery.com/jquery-2.1.1.min.js"></script>
<script src="/https://code.jquery.com/mobile/1.4.5/jquery.mobile-1.4.5.js"></script>
<script src="/cordova.js"></script>
<script>console.log = hyper.log</script>
</head>
<body>
<script>
myURL = "http://nuboidvm1.cloudapp.net/api/ping"
function getJSON() {
if (window.cordova){
console.log('Using Apache Cordova HTTP GET function');
cordovaHTTP.get(
myURL,
function (response) {
console.log("Answer is " + JSON.parse(response.data))
document.getElementById('printHere').innerHTML += "Answer is " + JSON.parse(response.data) + '<br>';
},
function (error){
console.log(JSON.stringify(error));
});
}
else {
console.log('Not using Cordova, fallback to AJAX via jquery');
$.ajax({
url: myURL,
jsonp: "callback",
cache: true,
dataType: "jsonp",
data: {
page: 1
},
success: function(response){
console.log("Answer is " + JSON.parse(response.data))
document.getElementById('printHere').innerHTML += "Answer is " + JSON.parse(response.data) + '<br>';
}
});
}
}
</script><br />
<button onClick="getJSON();">Ping</button>
<div id="printHere"></div>
</body>
</html>
--------------------
https://learn.sparkfun.com/tutorials/esp8266-thing-development-board-hookup-guide/setting-up-arduino
/* Blink without Delay
Turns on and off a light emitting diode (LED) connected to a digital
pin, without using the delay() function. This means that other code
can run at the same time without being interrupted by the LED code.
The circuit:
* LED attached from pin 13 to ground.
* Note: on most Arduinos, there is already an LED on the board
that's attached to pin 13, so no hardware is needed for this example.
created 2005
by David A. Mellis
modified 8 Feb 2010
by Paul Stoffregen
modified 11 Nov 2013
by Scott Fitzgerald
This example code is in the public domain.
http://www.arduino.cc/en/Tutorial/BlinkWithoutDelay
*/
// constants won't change. Used here to set a pin number :
const int ledPin = 13; // the number of the LED pin
// Variables will change :
int ledState = LOW; // ledState used to set the LED
// Generally, you should use "unsigned long" for variables that hold time
// The value will quickly become too large for an int to store
unsigned long previousMillis = 0; // will store last time LED was updated
// constants won't change :
const long interval = 1000; // interval at which to blink (milliseconds)
void setup() {
// set the digital pin as output:
Serial.begin(115200);
pinMode(ledPin, OUTPUT);
}
void loop() {
// here is where you'd put code that needs to be running all the time.
// check to see if it's time to blink the LED; that is, if the
// difference between the current time and last time you blinked
// the LED is bigger than the interval at which you want to
// blink the LED.
unsigned long currentMillis = millis();
if (currentMillis - previousMillis >= interval) {
// save the last time you blinked the LED
previousMillis = currentMillis;
// if the LED is off turn it on and vice-versa:
if (ledState == LOW) {
ledState = HIGH;
} else {
ledState = LOW;
}
Serial.println(ledState);
// set the LED with the ledState of the variable:
digitalWrite(ledPin, ledState);
}
}
see : https://learn.adafruit.com/esp8266-temperature-slash-humidity-webserver/code
///
#include <ESP8266WiFi.h>
#include <ESP8266HTTPClient.h>
#define aref_voltage 3.3
const int LED_PIN = 5;
const int TEMP_PIN = A0;
const char WiFiSSID[] = "Syntra-wifi";
const char WiFiPSK[] = "";
long randomValue;
void setup() {
randomSeed(analogRead(0));
initHardware();
connectWiFi();
}
void loop() {
Serial.println();
Serial.println("--- BEGIN LOOP---");
uint8_t mac[WL_MAC_ADDR_LENGTH];
WiFi.macAddress(mac);
String macID = String(mac[WL_MAC_ADDR_LENGTH - 2], HEX) + String(mac[WL_MAC_ADDR_LENGTH - 1], HEX);
macID.toUpperCase();
String deviceId = "MyDevice" + macID;
Serial.println(" DeviceiId : " + deviceId );
//float temperatureC = getTemperature(TEMP_PIN);
float temperatureC =random(300);
//randomValue = random(300);
Serial.print(" temperatureC : " );
Serial.println(temperatureC);
HTTPClient http;
http.begin("http://nuboidvm1.cloudapp.net:81/api/thing");
http.addHeader("Content-Type", "application/json; charset=utf-8");
http.POST("{\"DeviceId\":\"" + deviceId +"\",\"SensorType\":\"TEMPERATURE\",\"SensorValue\":" + temperatureC + "}");
http.writeToStream(&Serial);
http.end();
Serial.println(" Post Succesfull!");
Serial.println("--- BEGIN LOOP---");
}
float getTemperature(int pin)
{
int reading = analogRead(pin);
float voltage = reading * 3.3;
voltage /= 1024.0;
float temperatureC = (voltage - 0.5) * 100 ;
return temperatureC;
}
void initHardware()
{
Serial.begin(9600);
pinMode(LED_PIN, OUTPUT); // Set LED as output
digitalWrite(LED_PIN, HIGH); // LED off
//analogReference(EXTERNAL);
}
void connectWiFi()
{
byte ledStatus = LOW;
Serial.println();
Serial.println("Connecting to: " + String(WiFiSSID));
WiFi.mode(WIFI_STA);
WiFi.begin(WiFiSSID, WiFiPSK);
while (WiFi.status() != WL_CONNECTED)
{
digitalWrite(LED_PIN, ledStatus);
ledStatus = (ledStatus == HIGH) ? LOW : HIGH;
delay(100);
}
Serial.println("WiFi connected");
Serial.println("IP address: ");
Serial.println(WiFi.localIP());
}
//------------
//To install in PC or MAC
nieuw code .... test
http://www.tightvnc.com
http://winscp.net/
//---------------------------------------------------
//Some Linux Commands
Change Keyboard
sudo raspi-config
Print System Information
uname -a
Shutdown
sudo shutdown -h now
Get IP Address ?
hostname –I
Start Desktop
startx
Install Mono
sudo apt-get update
sudo apt-get install mono-complete
sudo apt-get install mono-runtime
mozroots --import --ask-remove –machine
mono myprogram.exe
TightVNC Server
sudo apt-get install tightvncserver
tightvncserver
vncserver :0 -geometry 1920x1080 -depth 24
//Sites
https://www.adafruit.com/
// Code voor aanroepen van een URL (via HTTP GET)
using System;
using System.Net.Http;
namespace TestMono
{
class Program
{
static void Main(string[] args)
{
var httpClient = new HttpClient();
const string url = "http://xeoplanstorage.blob.core.windows.net/dataforraspberry/data.txt";
var started = DateTime.Now;
for (int i = 0; i < 200 ; i++)
{
var task = httpClient.GetAsync(url);
var result = task.Result;
result.Content.LoadIntoBufferAsync(1000000);
var content = result.Content.ReadAsStringAsync().Result;
Console.WriteLine(content);
Console.WriteLine(i.ToString());
}
var ended = DateTime.Now;
var diff = (ended - started).TotalMilliseconds;
Console.WriteLine("duurde " + diff);
Console.ReadKey();
}
}
}
//Voorbeeld van een POST
public async void Post(String url, DebugDto insightsDto)
{
var httpClient = new HttpClient();
var jsonToPost = JsonConvert.SerializeObject(insightsDto);
var task = httpClient.PostAsync(url, new StringContent(jsonToPost, Encoding.UTF8, "application/json"));
var result = await task;
result.EnsureSuccessStatusCode();
}
http://dev.tinkermode.com/img/docs/raspberry_pi/LED.png
https://github.com/raspberry-sharp/raspberry-sharp-io
using Raspberry.IO.GeneralPurpose
var led1 = ConnectorPin.P1Pin07.Output();
var connection = new GpioConnection(led1);
while (true)
{
connection.Toggle(led1);
System.Threading.Thread.Sleep(250);
}
connection.Close();
//-------------
var led1 = ConnectorPin.P1Pin07.Output();
var connection = new GpioConnection(led1);
var httpClient = new HttpClient();
const string url = "http://xeoplanstorage.blob.core.windows.net/dataforraspberry/data.txt";
while (true)
{
var task = httpClient.GetAsync(url);
var result = task.Result;
result.Content.LoadIntoBufferAsync(1000000);
var content = result.Content.ReadAsStringAsync().Result;
Console.WriteLine(content);
if (content == "1")
{
connection.Pins[led1].Enabled = true;
}
if (content == "0")
{
connection.Pins[led1].Enabled = false;
}
}
//Hoe een file naar Azure opaden
Lees
https://azure.microsoft.com/en-us/documentation/articles/storage-dotnet-how-to-use-blobs/
gebruik : http://www.cloudberrylab.com/free-microsoft-azure-explorer.aspx
using Microsoft.WindowsAzure.Storage;
var storageAccount = CloudStorageAccount.Parse("DefaultEndpointsProtocol=http;AccountName=xeoplanstorage;AccountKey=Nhquua6CzZnae2K/8kclXLxbpQY3NfybpJU/xuGxqaooOStTS3UX6XoASbm4kkDSuhKxZ9vepbmo2dZOvnS/Mg==");
var blobClient = storageAccount.CreateCloudBlobClient();
var container = blobClient.GetContainerReference("dataforraspberry");
var blockBlob = container.GetBlockBlobReference("kurt.txt");
blockBlob.UploadText("0");
//// EEN API
[Route("api/ping")]
public class PingController : ApiController
{
public IHttpActionResult Get()
{
Console.WriteLine("Ping called");
return Ok("Pong from cloud");
}
}
//
using System;
using System.Web.Http;
using Microsoft.Owin.Hosting;
using Owin;
namespace IOTAPI
{
class Program
{
static void Main(string[] args)
{
var startOptions = new StartOptions("http://localhost");
WebApp.Start<Startup>(startOptions);
Console.ReadKey();
}
}
public class Startup
{
public void Configuration(IAppBuilder app)
{
var config = new HttpConfiguration();
config.Formatters.XmlFormatter.SupportedMediaTypes.Clear();
config.MapHttpAttributeRoutes();
app.UseWebApi(config);
}
}
}
/// de config
<?xml version="1.0" encoding="utf-8"?>
<configuration>
<startup>
<supportedRuntime version="v4.0" sku=".NETFramework,Version=v4.5" />
</startup>
<runtime>
<assemblyBinding xmlns="urn:schemas-microsoft-com:asm.v1">
<dependentAssembly>
<assemblyIdentity name="Microsoft.Owin" publicKeyToken="31bf3856ad364e35" culture="neutral" />
<bindingRedirect oldVersion="0.0.0.0-3.0.1.0" newVersion="3.0.1.0" />
</dependentAssembly>
</assemblyBinding>
</runtime>
</configuration>
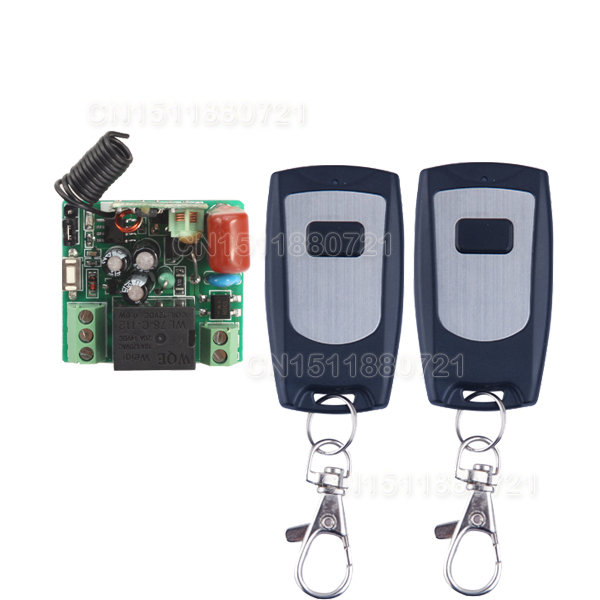
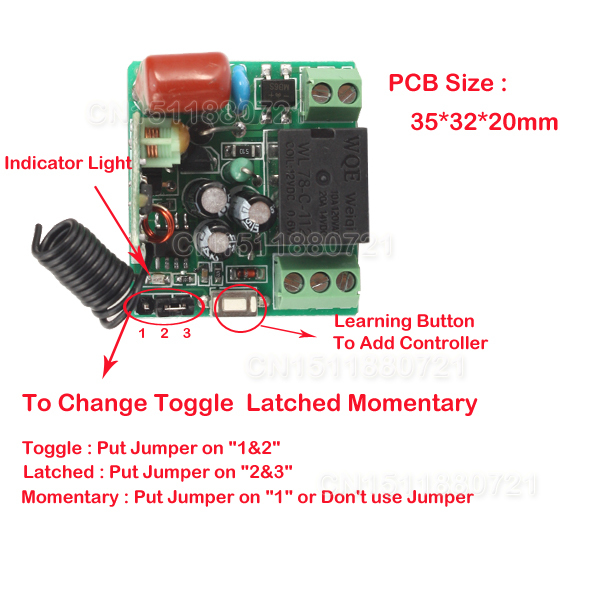
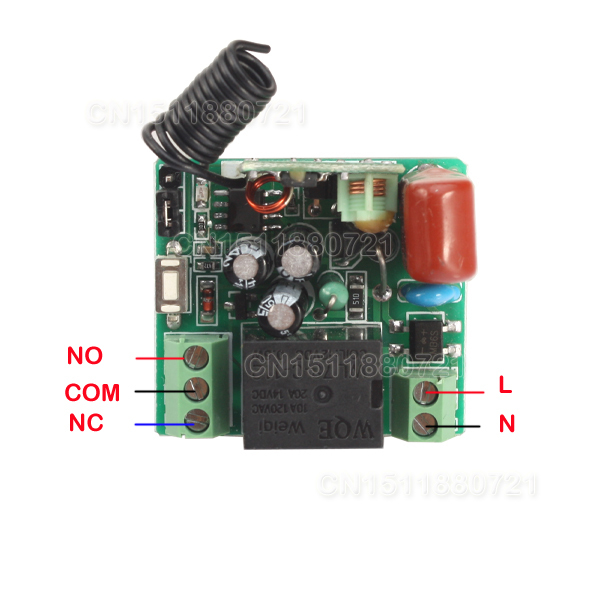
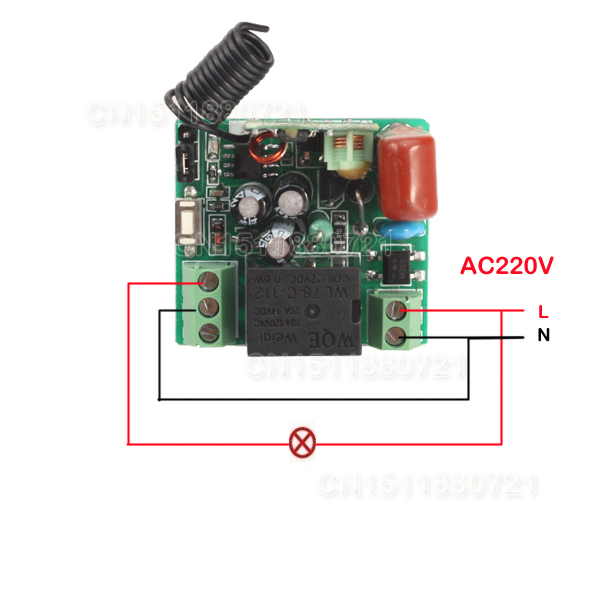
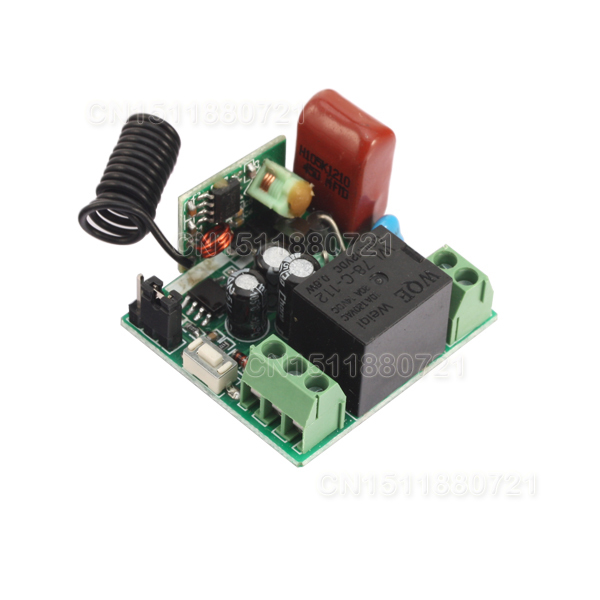
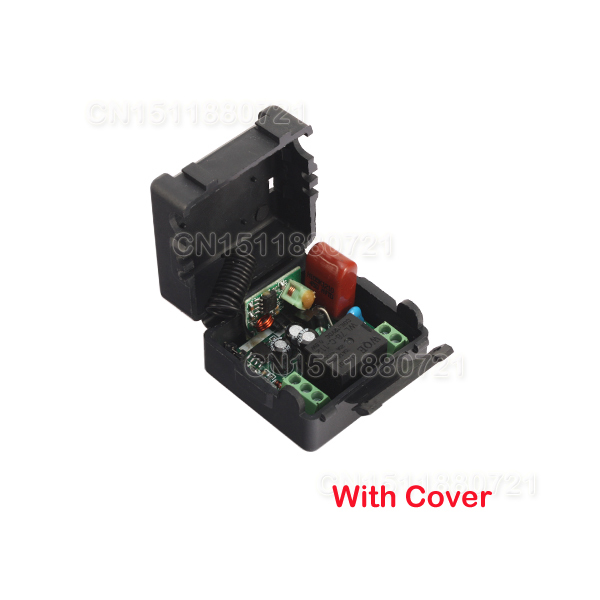
AC 220V Remote Control Switch 1 CH 10A Relay Receiver 2Transmitter LED Lamp Light Remote ON OFF Wireless Switch 315/433 RX TX
- is_customized:
- Operating Temperature:
- Brand Name:
- Max. Voltage:
- Max. Current:
- Model Number:
- Output State:
- work with which kind remote control:
- PCB size:
- Learning code:
- Frequency:


Install Joomla on Raspberry Pi 2 Model B
http://joomlaresources.com/joomla-tutorials/how-to-install-joomla-on-raspberry-pi-2-model-b
The Raspberry Pi is such a wonderful device for hosting websites. Where else can you get a full time web server that not only costs about than $40 to purchase, but also the fact that it costs less than $5 a year to keep running is phenominal! I have been using Raspberry Pi's as webservers here at home since the Model A was introduced. I received my first Model A in May, 2012, and since then, I have also aquired two Model B (512MB RAM), One Model B+ and finally one Pi 2 (with another just ordered and on the way from Amazon).
The Two Model B's are running Samba and SFTP for my Network Attached Storage at home, The Model B+ was my primary webserver until the Pi 2 showed up, and now is a secondary internal network webserver. The Pi 2 is my live server, accessible from the internet through the home IP address and port forwarding. The second Pi 2 that is coming will actually be colocated at a datacenter.
The Raspberry Pi 2 is perfect for use as a small webserver. With a 900MHz Quad-core ARM Cortex-A7 and 1GB LPDDR2 RAM memory and the fact that it does indeed run off a 5V 2Amp Mobile Phone wall charger with a MicroUSB plug really makes it perfect for home (or small business) use.
Since this article is about installing Joomla on a Raspberry Pi 2 (Model B) on your home network, let's get into it!
 Raspberry Pi 2, Model B with enclosure/fan combo - Purchased for $59USD from Amazon.com
A Note about MicroSD Cards:
I purchased 128GB MicroSD Cards specifically to use with the Pi2, but the Pi doesn't seem to recognize either one (made by Sandisk), but it does indeed recognize a 64GB Extreme Pro II card (also Sandisk) with write speeds Up To 95MB/s. It was well worth the $53 to have the faster speeds as this is going to be a web server, after all.
In the image above, I did attach the 128GB microSD through the USB adaptor for SFTP storage, not related to this tutorial.
Other Parts Purchased:
Also, The Pi 2 is housed in a TonTec Transparent Cover Box Enclosure with Mini FanTransparent Cover Box Enclosure with Mini Fan that was included in the $59 combo deal. It's powered by the GPIO pins so there's no worry about having to run an extra power line.
Not shown:
Powering the Raspberry Pi 2 is a RAVPower 4.8A Dual USB Wall Charger which supplies 2.4V to each of it's two USB ports (enough for two Pi 2 Model B's). I purchased two of these chargers also off Amazon for $8USD each.
This tutorial also works on a Raspberry Pi Model B and Model B+
If you haven't already downloaded, installed and configured the Raspbian OS, do so now. For the sake of those who already know, there's a wonderful tutorial on how to get the MicroSD card setup from Lifehacker:
You will need to SSH to your Raspberry Pi 2 and use the command line to perform the work. If you don't know how to connect via SSH to your Pi, check out "Use SSH to Talk With Your Raspberry Pi" on Instructables.
This Tutorial Covers A Home Web Server That Is NOT Accessible From The Internet (I do not cover port forwarding, apache2 virtual host configuration or Pointing the Domain name)
What Is The Pi's IP Address?
You can see what the Pi's IP address is by either logging into your router and checking the connected IPs, or if you have the Pi connected to a keyboard and monitor, just open up the terminal and type in:
ifconfig
You will find the IP address under ETH0 if you are cable connected, or WLAN0 if you are on WI-FI.
Setting The Raspberry Pi Server Time
You'll want to make sure that the Raspberry Pi clock is running in your timezone, so first thing you should do is run:
sudo dpkg-reconfigure tzdata
Just set your country and select the correct timezone.
Next update and upgrade your Raspberry Pi:
sudo apt-get update && sudo apt-get upgrade -y
IMPORTANT: If you haven't done so already, change the default password for user "pi" now. Since my Pi will be accessible on the internet, we don't need to make life easy for hackers by leaving the generic password in place. To change the password for the "pi" user (I'm assuming you've connected via SSH with the pi user):
sudo passwd pi
Now, just enter your new password twice to set the password.
Install Apache2, PHP and MySQL:
sudo apt-get install apache2 php5 libapache2-mod-php5 php5-gd php5-curl mysql-server mysql-client php5-mysql -y
The installer will ask you to enter a password for the root MySQL user twice during this operation.
Now, just restart Apache2:
sudo service apache2 restart
Create The Joomla Database and Database User:
Enter into MySQL by typing the following command:
MSQL -u root -p
It will prompt you for a password. use the one you just set up in the previous step.
Create the Joomla Database
We will call the database "joomla" for this tutorial, but you can name it whatever you wish.
CREATE DATABASE joomla;
Now, Create the Database user: (replace newuser with a desired username, and password with the desired password (a-z, 0-9))
CREATE USER 'newuser'@'localhost' IDENTIFIED BY 'password';
Now, you have to grant the permissions to the user on the database
GRANT ALL PRIVILEGES ON * . * TO 'newuser'@'localhost' identified by 'password';
Lastly, reload all the privileges:
FLUSH PRIVILEGES;
Install Joomla on your Raspberry Pi 2
Now you want to go to the web accessible directory.
cd /var/www
once here, you need to download Joomla! Go to the Joomla! Github releases page and copy the link for the latest ZIP version.

On the command prompt in your SSH window, type:
wget (paste link here)
so in this case, it looks like this:
wget https://github.com/joomla/joomla-cms/releases/download/3.4.3/Joomla_3.4.3-Stable-Full_Package.zip
Joomla will now download. Once complete, unzip it:
unzip (packagename_here.zip)
which in my tutorial here, would look like this:
unzip Joomla_3.4.3-Stable-Full_Package.zip
The Joomla files have now been installed.
Now you need to give "www-data" ownership of the www folder:
chown -R www-data:www-data /var/www
Configure Joomla From Your Web Browser
At this time, open your web browser and enter the IP address of your Raspberry PI. You will find the standard Joomla web install page:

Fill in the site name, your email address, the username and password for the admin user (you), and click the next button.

The next screen is the database screen. Fill the field out with your database name, database username and password that you previously created in the MySQL part of the tutorial above. The table prefix is automatically populated, so you can leave this alone. Also, you can leave "Old Database Process" alone because this is a new installation.

Finally, you can just click Install on the "Finalisation" page to begin the installation.

The installer will complete within 5 minutes and you'll see the "Congratulations" screen below:

Click the orange "Remove installation folder" button to remove the install folder. The button will change to say "Installation folder successfully removed" when complete.

Finally, you can click either the SITE button to view the front end of your new Joomla site running on the Raspberry Pi 2:

Or you can login to the admin panel at http://(yourIPaddresshere)/administrator - for this tutorial, if my raspberry Pi's IP address was 192.168.1.100, then the login URL would be:
http://192.168.1.100/administrator

And successfully logging in, you will be greeted by your Joomla Administrator Control Panel!

Speeding Up Your Joomla Website Running On A Raspberry Pi 2, Model B
Don't be suprised if your Joomla site is running slow right now. That's expected. We need to go back to the control panel and install memcached and APC in order to speed things up a bit.
Back in your command line SSH terminal, install Memcached:
sudo apt-get install memcached -y
Memcashed will install and complete.
Install APC on Raspberry Pi
Now install the APC dependencies first:
sudo apt-get install php-pear php5-dev make libpcre3-dev php5-apc
Now install APC itself:
sudo pecl install apc
You will be asked a number of questions but unless you know exactly what you are enabling, go with the defaults by hitting Enter.
Now, you will need to edit the php.ini file on your raspberry pi, but in order to do this, you have to install "NANO" a simple text editor:
sudo apt-get install nano -y
Now that nano is installed, edit the PHP.ini file:
sudo nano /etc/php5/apache2/php.ini
scoll down to the bottom of the file by hitting the "page down" button repeatedly until you can't go any further, then type:
extension = apc.so
and hit CTRL-x
Then the Y key
This will save the file. You now need to restart Apache2 for the changes to take place:
sudo service apache2 restart
And that's It! You've installed Joomla on a Raspberry Pi 2 (model b)! Have fun!